Wednesday, October 1, 2014

MSSQL Security Logins

Hello Everyone,

This is another day full of new insights and learning on how to manage users in MSSQL. On this topic we will discuss how to grant user access to Database/s.

Below is the step by step procedure:

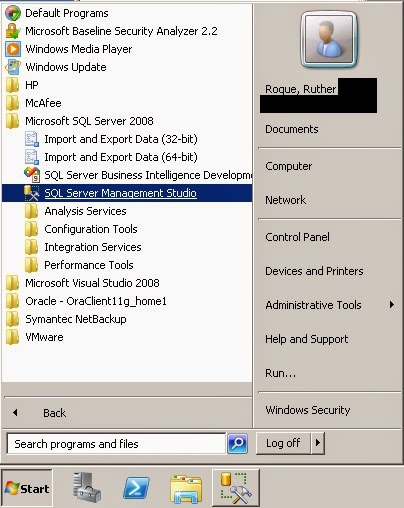
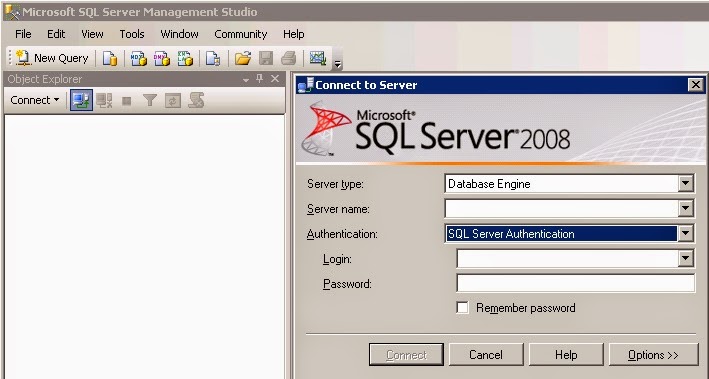
Step 1. First you will need to login to SQL Server Management Studio: Define which DB Server you are connecting to.


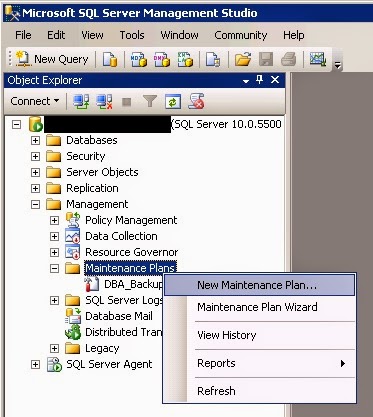
Step 2. Go to Logins. Expand Security of the DB Server.


Step 3. Create New Login. Right click "Logins" and click "New Login..."


Step 4. On the "General" page of the Login - New window, you can either search for a windows authenticated user or you can manually create a SQL authenticated user with your preferred username and password:

Note: For security reasons, just for this topic, you should define the "Default database" to a user Database (ex: TestDataBase). By default, it is always set to "master".


Step 5. On the "Select  a page", click Server Roles. By default, "Public" role is always assigned to a SQL Server Login.


Note:
- For Server Level Roles definition, you might want to check this link - http://msdn.microsoft.com/en-us/library/ms188659.aspx

Sample:
- If you want to perform any activity in the SQL Server, GRANT the user sysadmin role. On the other hand, if you wish to GRANT a user with DB role membership only, proceed to Step 6.


Step 6. Go to "User Mapping" page, select and assign a Database to a user then GRANT database role membership to the user.


Note: You can check the link http://msdn.microsoft.com/en-us/library/ms189121.aspx for DB role membership.

Step 7. After modifying the DB role membership, click "OK" button.


Congratulations! You're done creating SQL user.

For any Comments or Suggestions, please feel free!


Sunday, August 3, 2014

MSSQL Maintenance: FULL Database Backup


Hi Everyone,

Just want to share how to use MSSQL Maintenance to run a Back Up Database Task with Maintenance Cleanup Task.

Below are the step by step process:

1. Open SSMS - SQL Server Management Studio


2. Login to SSMS - SQL Server Management Studio


3. expand Management of Database Server, then right click Maintenance Plan to create New Maintenance Plan...


4. Type the name of your new Backup, then click Ok.


5. Configure the Backup Job Schedule, once your done, Click Ok. (i.e. if you want it to run Daily, Weekly, Monthly)


6. Click and Drag Backup Database Task and Maintenance Cleanup Task to the Maintenance Plan created.


7. Don't forget to link Backup DB task and Maintenance Cleanup Task


8. Right click then Edit Back Up Database Task. Don't forget to input the path from where you will dump the backup files and backup file extension (bak). Once your done with configuration, click Ok.


9. Right click then Edit Maintenance Cleanup Task. Set the same folder path and file extension, the same folder you set in Back Up Database Task. After you are done configuring the Cleanup task, click Ok.


10. Now SAVE your work and your Done!

Your DB Full Backup Maintenance Plan is ready run.

Congratulation!

Monday, February 11, 2013


SQL: Toddlers Query (DELETE & TRUNCATE Statement)

This is the last part of the DML Statement. DELETE statement is to remove a row or multiple rows in a table. Deleting the target table without the WHERE clause specifying your target column and value would mean a career without a job. J
Basic Syntax:

DELETE FROM table WHERE predicate;

Below are the sample DELETE statements that will help you remove records from your table.

Friends Table:

FriendsID
Friends_Number
FirstName
LastName
Country
City
1
7001
Mel
Passion
Philippines
Manila
2
7002
CJ
Samuel
Australia
Sydney
3
7003
Jasmin
Tyler
Philippines
Manila
4
7004
Fred
Dylan
Philippines
Novaliches
5
7005
Joseph
Jonathan
Philippines
Pasig
6
7006
Jennifer
Caleb
USA
Corona
7
7007
Champy
Rivera
New Zealand
Oakland
8
7008
Ivy
Hotdog
New Zealand
Oakland
9
7009
Sydney
Strips
Philippines
Malabon
10
7010
Miguel
Porkchop
Philippines
Mandaluyong

Example 1

OBJECTIVE: Run the command below to DELETE the rows WHERE country is filtered by Philippines.

DELETE FROM Friends WHERE Country = Philippines;

FriendsID
Friends_Number
FirstName
LastName
Country
City
2
7002
CJ
Samuel
Australia
Sydney
6
7006
Jennifer
Caleb
USA
Corona
7
7007
Champy
Rivera
New Zealand
Oakland
8
7008
Ivy
Hotdog
New Zealand
Oakland

NOTE: When you run this code, SQL Server returns the following message, indicating that 6 rows were deleted.

(6 row(s) affected)

Example 2

OBJECTIVE: Run the below TRUNCATE query to delete all rows in the target table.

TRUNCATE TABLE Friends;

FriendsID
Friends_Number
FirstName
LastName
Country
City

NOTE:
      -          After executing the query, the target table is empty.

-          TRUNCATE TABLE is substantially faster than DELETE and uses fewer system and transaction log resources and does not have optional filter (ex: WHERE).

SQL: Toddlers Query (UPDATE Statement)

This is the second part of our DML (Data Manipulation Language) Statement. UPDATE statement is one of the most critical part second to DELETE statement. I just wanted to remind everyone to be aware on running an update statement in a production environment. Make sure you highlight the correct UPDATE query statement and SET clause along with the WHERE clause.

Basic Syntax:

UPDATE TableName      

SET column-1 = ‘value-1’, column-2 = ‘value-2’, .. column-n = ‘value-n’

WHERE predicate;

I’ve listed down some basic examples of UPDATE statements that you can use to update the columns of your table:

Friends Table

FriendsID
Friends_Number
FirstName
LastName
Country
City
1
7001
Mel
Jacob
Philippines
Quezon
2
7002
CJ
Samuel
Philippines
Valenzuela
3
7003
Jasmin
Tyler
Philippines
Quezon
4
7004
Fred
Dylan
Philippines
Novaliches
5
7005
Joseph
Jonathan
Philippines
Pasig
6
7006
Jennifer
Caleb
USA
Corona
7
7007
Champy
Rivera
New Zealand
Oakland
8
7008
Ivy
Hotdog
New Zealand
Oakland
9
7009
Sydney
Strips
Philippines
Malabon
10
7010
Miguel
Porkchop
Philippines
Mandaluyong


Example 1

OBJECTIVE: Run the sample query below to UPDATE the last name of Mel filtered by friends number column with the value of 7001:

UPDATE Friends SET LastName =’Passion’ WHERE Friends_Number =’7001’;

After running update query, run the select statement to view the updated column in Friends table:

SELECT FirstName, LastName, Country WHERE Friends_Number =’7001’;

FirstName
LastName
Country
Mel
Passion
Philippines

NOTE: If you will notice in the original Friends Table, the last name of Mel after updating the Friends table was changed to Passion.

Example 2

OBJECTIVE: Run the sample query below to update the column last name, country and city filtered by Friends_number column with 7002 value:

UPDATE Friends

SET         LastName = ‘Samuel’,

                Country = ‘Australia’,

                City = ‘Sydney’

WHERE Friends_Number = ‘7002’;

To view the update table, run the below query:

SELECT * FROM Friends WHERE Friends_Number =’7002’;

FriendsID
Friends_Number
FirstName
LastName
Country
City
2
7002
CJ
Samuel
Australia
Sydney


NOTE: If you will notice in the original Friends Table, the last name, Country and City of CJ were updated after running the update script.

Example 3

OBJECTIVE: Update the column city of “Friends” table with a filtered value of “Quezon”.

UPDATE Friends SET City =’Manila’ WHERE City =’Quezon’;

Run the query below to view the updated Friends Table

SELECT FirstName, LastName, Country, City WHERE City =’Manila’;

FriendsID
Friends_Number
FirstName
LastName
Country
City
1
7001
Mel
Jacob
Philippines
Manila
3
7003
Jasmin
Tyler
Philippines
Manila


NOTE: As you will notice, we have updated the City named ‘Quezon’ to ‘Manila’, but we didn’t identify how many users live in the same City (Quezon). In updating a value in a column, we should consider in evaluating the table first before we updating a value in a table. What you can do to check is to count the duplicate records, run the select statement below to find out: (fill-out the table name and column name based on your created table)

SELECT column-1, column-2, .. column-n, count(*)

FROM table

GROUP BY column-1, column-2, .. column-n

HAVING count (*) > 1